

Building Feature Stores with Redis: Introduction to Feast with Redis
Learn more


This tutorial provides a step-by-step Feast for Redis quickstart that walks you through an end-to-end example of using Feast with Redis as its online feature store for machine learning. It’s based on the Feast Quickstart tutorial, but instead of using the default online store, it uses the Redis online store for delivering real-time predictions at scale. If you’re not familiar with Feast or Redis, then the fastest way to get started with Feast using Redis is through this tutorial. Please refer to this Feature Stores and Feast using Redis blog article for a high-level introduction. More detailed information on Redis and Feast, as well as additional resources, are available at the end of this tutorial.
In this tutorial you will:
You can run the tutorial on Google Colab or on your localhost following the guided steps below.
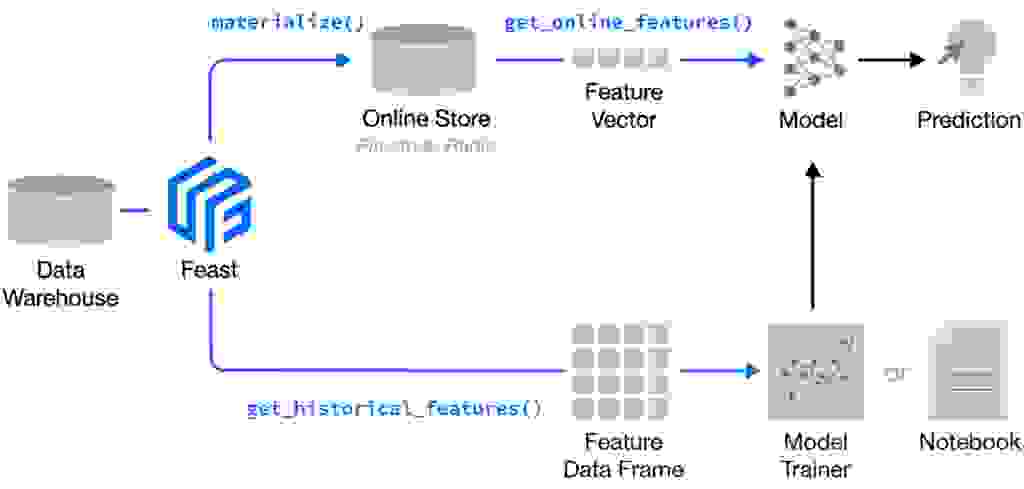
Feast (Feature store) is an open source feature store and is part of the Linux Foundation AI & Data Foundation. It can serve feature data to models from a low-latency online store (for real-time serving) or an offline store (for model training or batch serving). It also provides a central registry so machine learning engineers and data scientists can discover the relevant features for ML use cases. Below is a high-level architecture of Feast:
Feast is a Python library + optional CLI. You can install Feast using pip, as will be described soon in this tutorial.
Feast with Redis solves several common issues in this flow:
In this tutorial, we use feature stores to generate training data and power online model inference for a ride-sharing driver satisfaction prediction model. In the demo data scenario:
To install Redis follow one of the alternatives below:
Ubuntu:
$ sudo snap install redisDocker:
$ docker run --name redis --rm -p 6379:6379 -d redis
Mac (Homebrew):
$ brew install redis
Additional information on alternative ways for installing Redis can be found here. Additional configuration information can be found in the Redis Quick Start guide.
Install the Feast SDK and CLI using pip:
$ pip install 'feast[redis]'
A feature repository is a directory that contains the configuration of the feature store and individual features.
The easiest way to create a new feature repository is to use the feast init command. This creates a scaffolding with initial demo data.
$ feast init feature_repo
$ cd feature_repo
Output:
Creating a new Feast repository in /Users/nl/dev_fs/feast/feature_repo
Let’s take a look at the resulting demo repo itself. It breaks down into:
To configure Redis as the online store we need to set the type and connection_string values for online_store in feature_store.yaml as follows:
| project: my_project registry: data/registry.db provider: local online_store: type: redis connection_string: localhost:6379 |
The provider defines where the raw data exists (for generating training data and feature values for serving) in this demo, locally. The online_store defines where to materialize ( load) feature values in the online store database (for serving).
Note that the above configuration is different from the default YAML file provided for the tutorial that instead uses the default online store :
| project: my_project registry: data/registry.db provider: local online_store: path: data/online_store.db |
So by adding these two lines for online_store (type: redis, connection_string: localhost:6379) in the YAML file per the above, Feast is then able to read and write from Redis as its online store. Redis Online Store is part of the Feast core code, and as such, Feast knows how to use Redis out-of-the-box.
Let’s take a look at the demo feature definitions at example.py (to view it in your terminal you can run cat example.py ).
Example.py
# This is an example feature definition file

from google.protobuf.duration_pb2 import Duration

from feast import Entity, Feature, FeatureView, FileSource, ValueType

# Read data from parquet files. Parquet is convenient for local development mode. For
# production, you can use your favorite DWH, such as BigQuery. See Feast documentation
# for more info.
driver_hourly_stats = FileSource(
    path="/content/feature_repo/data/driver_stats.parquet",
    event_timestamp_column="event_timestamp",
    created_timestamp_column="created",
)

# Define an entity for the driver. You can think of entity as a primary key used to
# fetch features.
driver = Entity(name="driver_id", value_type=ValueType.INT64, description="driver id",)

# Our parquet files contain sample data that includes a driver_id column, timestamps and
# three feature column. Here we define a Feature View that will allow us to serve this
# data to our model online.
driver_hourly_stats_view = FeatureView(
    name="driver_hourly_stats",
    entities=["driver_id"],
    ttl=Duration(seconds=86400 * 1),
    features=[
        Feature(name="conv_rate", dtype=ValueType.FLOAT),
        Feature(name="acc_rate", dtype=ValueType.FLOAT),
        Feature(name="avg_daily_trips", dtype=ValueType.INT64),
    ],
    online=True,
    batch_source=driver_hourly_stats,
    tags={},
)
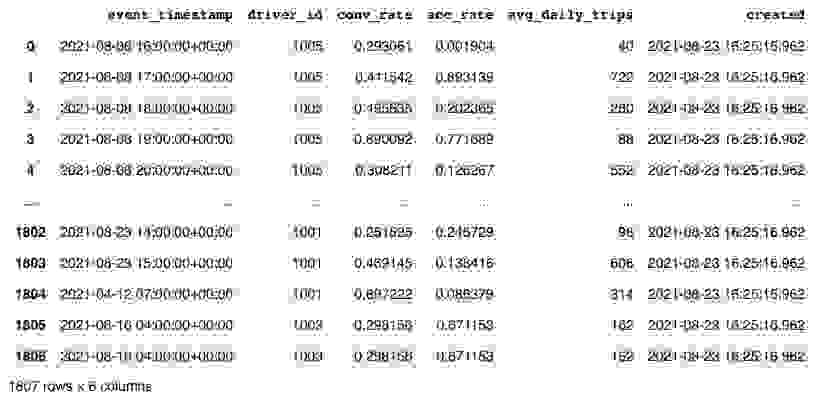
Finally, let’s inspect the raw data. The raw data we have in this demo is stored in a local parquet file. The dataset captures the hourly stats of a driver in a ride-sharing app.
Now we run feast apply to register the feature views and entities defined in example.py. The apply command scans Python files in the current directory for feature view/entity definitions, registers the objects, and deploys infrastructure. In this example, it reads example.py (shown above) and sets up the Redis online store.
$ feast apply
Output:
| Registered entity driver_id Registered feature view driver_hourly_stats Deploying infrastructure for driver_hourly_stats |
To train a model, we need features and labels. Often, this label data is stored separately (e.g. you have one table storing user survey results and another set of tables with feature values).
The user can query that table of labels with timestamps and pass that into Feast as an entity dataframe for training data generation. In many cases, Feast will also intelligently join relevant tables to create the relevant feature vectors.
Python
(Copy the code below into a file gen_train_data.py and then run it):
from datetime import datetime, timedelta
import pandas as pd

from feast import FeatureStore

# The entity dataframe is the dataframe we want to enrich with feature values
entity_df = pd.DataFrame.from_dict(
    {
        "driver_id": [1001, 1002, 1003],
        "label_driver_reported_satisfaction": [1, 5, 3],
        "event_timestamp": [
            datetime.now() - timedelta(minutes=11),
            datetime.now() - timedelta(minutes=36),
            datetime.now() - timedelta(minutes=73),
        ],
    }
)

store = FeatureStore(repo_path=".")

training_df = store.get_historical_features(
    entity_df=entity_df,
    features=[
        "driver_hourly_stats:conv_rate",
        "driver_hourly_stats:acc_rate",
        "driver_hourly_stats:avg_daily_trips",
    ],
).to_df()

print("----- Feature schema -----\n")
print(training_df.info())

print()
print("----- Example features -----\n")
print(training_df.head())
Output:
| ----- Feature schema ----- <class 'pandas.core.frame.DataFrame'> Int64Index: 3 entries, 0 to 2 Data columns (total 6 columns): # Column Non-Null Count Dtype --- ------ -------------- ----- 0 event_timestamp 3 non-null datetime64[ns, UTC] 1 driver_id 3 non-null int64 2 label_driver_reported_satisfaction 3 non-null int64 3 conv_rate 3 non-null float32 4 acc_rate 3 non-null float32 5 avg_daily_trips 3 non-null int32 dtypes: datetime64[ns, UTC](1), float32(2), int32(1), int64(2) memory usage: 132.0 bytes None ----- Example features ----- event_timestamp driver_id ... acc_rate avg_daily_trips 0 2021-08-23 15:12:55.489091+00:00 1003 ... 0.120588 938 1 2021-08-23 15:49:55.489089+00:00 1002 ... 0.504881 635 2 2021-08-23 16:14:55.489075+00:00 1001 ... 0.138416 606 [3 rows x 6 columns] |
We will now load or materialize feature data into your Redis online store so we can serve the latest features to models for online prediction. The materialize command allows users to materialize features over a specific historical time range into the online store. It will query the batch sources for all feature views over the provided time range, and load the latest feature values into the configured online store. materialize–incremental command will only ingest new data that has arrived in the offline store, since the last materialize call.
$ CURRENT_TIME=$(date -u +"%Y-%m-%dT%H:%M:%S")
$ feast materialize-incremental $CURRENT_TIME
Output:
| Materializing 1 feature views to 2021-08-23 16:25:46+00:00 into the redis online store. driver_hourly_stats from 2021-08-22 16:25:47+00:00 to 2021-08-23 16:25:46+00:00: 100%|████████████████████████████████████████████| 5/5 [00:00<00:00, 592.05it/s] |
At inference time, we need to quickly read the latest feature values for different drivers (which otherwise might have existed only in batch sources) from Redis online feature store, using get_online_features(). These feature vectors can then be fed to the model.
Python
(Copy the code below into a file get_feature_vectors.py and then run it):
from pprint import pprint
from feast import FeatureStore

store = FeatureStore(repo_path=".")

feature_vector = store.get_online_features(
    features=[
        "driver_hourly_stats:conv_rate",
        "driver_hourly_stats:acc_rate",
        "driver_hourly_stats:avg_daily_trips",
    ],
    entity_rows=[
        {"driver_id": 1004},
        {"driver_id": 1005},
    ],
).to_dict()

pprint(feature_vector)
Output
| { 'acc_rate': [0.5732735991477966, 0.7828438878059387], 'avg_daily_trips': [33, 984], 'conv_rate': [0.15498852729797363, 0.6263588070869446], 'driver_id': [1004, 1005] } |
Congratulations! You have reached the end of the tutorial. To shut down the Redis server that is running in the background you can use the redis-cli shutdown command.
In this tutorial you’ve deployed a local feature store with a Parquet file offline store and Redis online store. You then built a training dataset using time series features from Parquet files. Then, you materialized feature values from the offline store into the Redis online store. Finally, you read the latest features from the Redis online store for inference. With Redis as the online store you can read the latest feature very quickly for real-time ML use cases, with low latency and high throughput at scale.
Join other Feast users and contributors in Slack and become part of the community!