

How to Build a Squad Health Check Application with Redis
Learn more


A/B testing has become an indispensable asset to marketers and website owners competing in today’s digital economy. It allows users to test existing ideas, experiment with new ones and highlight what works and what doesn’t.
Without this information, trying to optimize web pages can be a frustrating and time-consuming process. But unfortunately, A/B testing software can be expensive, preventing many from having access to its benefits.
But with Redis, programmer Thiago Camargo was able to remove these barriers by creating an open A/B testing tool that can operate in real time. Redis’ powerful data processing features allow users to experiment with variables of their choosing and discover the most effective ways to optimize their web pages.
Let’s take at how Thiago was able to put this application together. But before we go any further, we’d like to point out that we have a wide variety of innovative applications for you to discover on the Redis Launchpad.
So make sure to have a browse after this post!
You’ll build a powerful yet simple A/B testing tool that’s scalable and operates in real time. Below we’ll show you how to build this application from the bottom up, highlighting what components are required along with their functionality.
Also known as split testing, A/B testing refers to a methodical experimentation process where two or more versions of a variable are shown to website visitors to determine which one has a greater impact on conversions.
It’s designed to add clarity on how you can position your brand, products, and services more effectively in the marketplace.
Let’s say for example you have a product on your website you’re trying to sell. One variable you could experiment with would be the call to action (CTA) button next to the product. There are a number of different ways you can A/B test the CTA, including:
By split testing these variables, you’ll discover which version of your CTA is going to be most optimal to driving conversions.
$ git clone https://github.com/redis-developer/banda
$ gradle task
$ gradle wrapper
$ ./gradlew clean build
If you’re using Docker desktop, ensure that the file sharing option is enabled for the volume mount. Use the code below to set up Redis:
docker run \
  -p 6379:6379 \
  -v /home/user/redis_data:/data \
  -it \
  redislabs/redismod \
  --loadmodule /usr/lib/redis/modules/rejson.so \
  --loadmodule /usr/lib/redis/modules/redistimeseries.so \
  --loadmodule /usr/lib/redis/modules/redisgraph.so \
  --dir /data
Use the code below to start up the docker:
docker run -p 8080:8080 -e BASE_URL -e PORT -e REDIS_URL com.xmppjingle/bjomeliga-docker-boot -ti
  .   ____          _            __ _ _
 /\\ / ___'_ __ _ _(_)_ __  __ _ \ \ \ \
( ( )\___ | '_ | '_| | '_ \/ _` | \ \ \ \
 \\/  ___)| |_)| | | | | || (_| |  ) ) ) )
  '  |____| .__|_| |_|_| |_\__, | / / / /
 =========|_|==============|___/=/_/_/_/
 :: Spring Boot ::        (v2.3.1.RELEASE)

2021-10-03 13:19:15.856  INFO 1 --- [           main] c.x.bjomeliga.BjomeligaApplicationKt     : Starting BjomeligaApplicationKt on b9002f934d84 with PID 1 (/bjomeliga-0.0.1-SNAPSHOT.jar started by root in /)
2021-10-03 13:19:15.863  INFO 1 --- [           main] c.x.bjomeliga.BjomeligaApplicationKt     : No active profile set, falling back to default profiles: default
2021-10-03 13:19:18.253 INFO 1 --- [ main] .s.d.r.c.RepositoryConfigurationDelegate : Multiple Spring Data modules found, entering strict repository configuration mode!
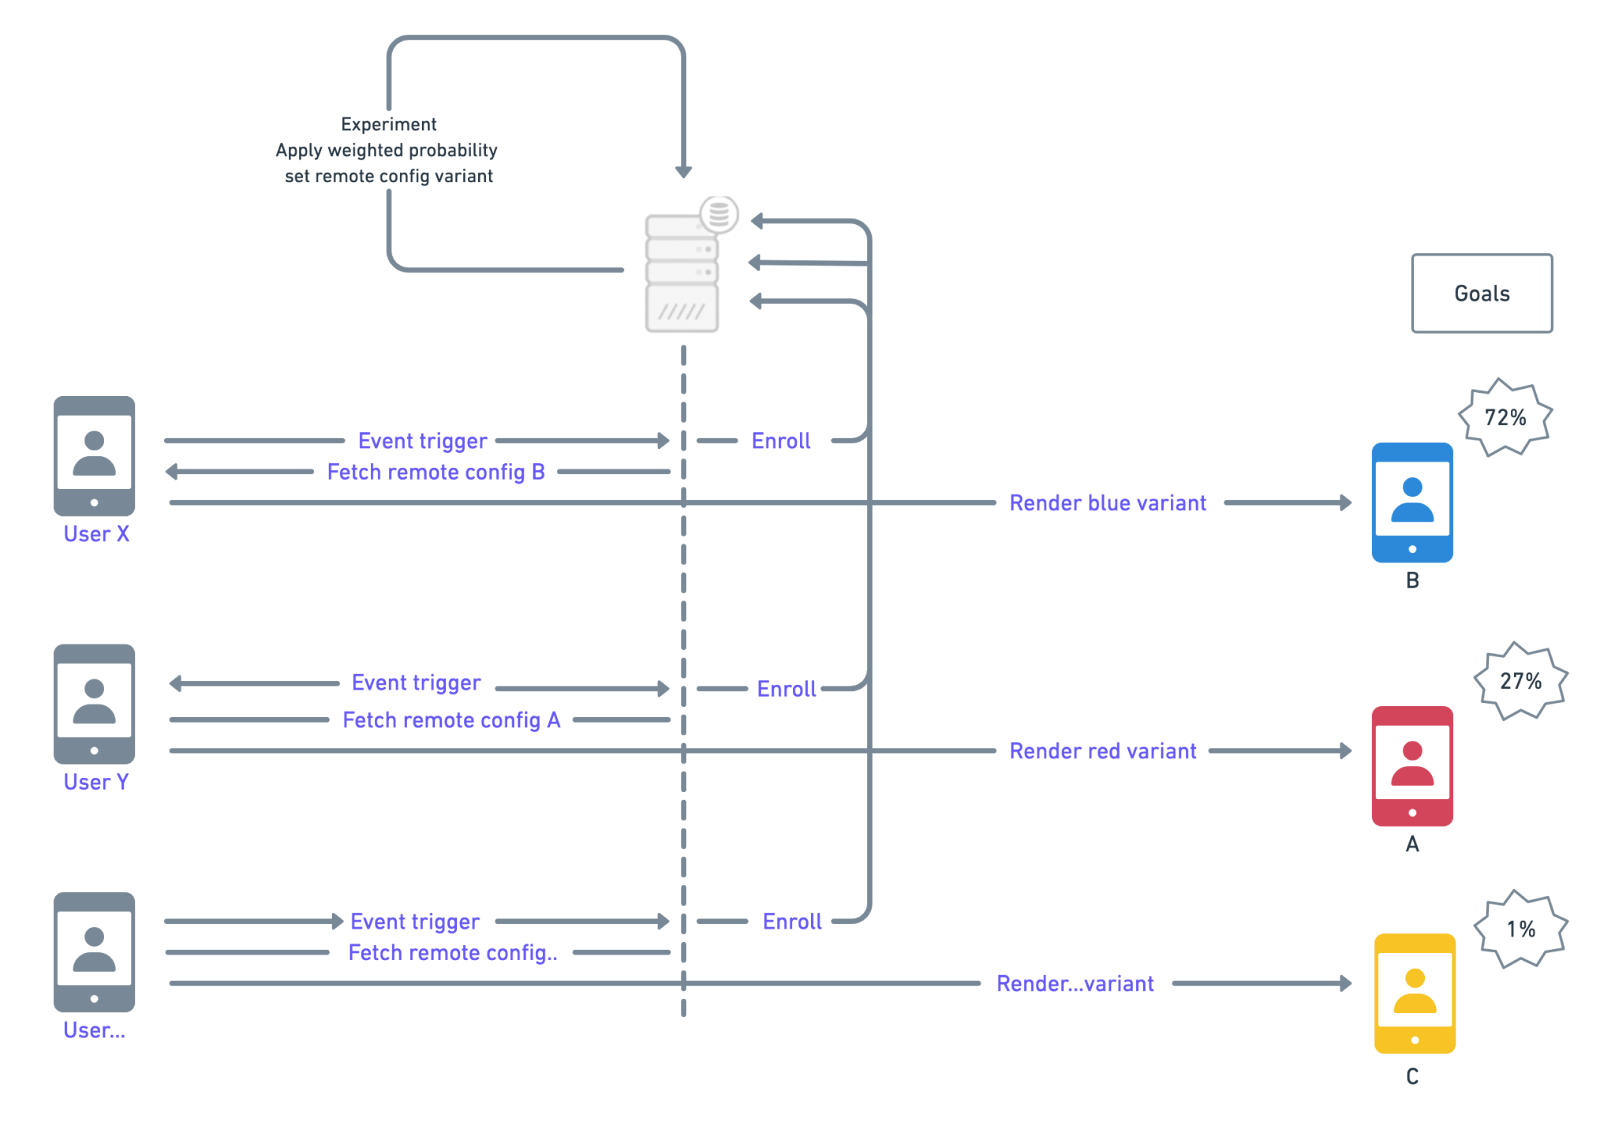
Here we’re going to show you how to create scalable A/B testing experiments with trigger-based weighted enrollment.
In this step, we’ll show you how to create an experiment that allows you to A/B test different variables. We’re going to put ourselves in the shoes of a marketer looking to split test the different screen colors to see what impact they have on sales.
To get started, use the code below.
curl --location --request POST 'localhost:8080/experiment' \
--header 'Content-Type: application/json' \
--data-raw '{
  "goalIds": [
    "purchase"
  ],
  "id": "subscription1",
  "triggerEventId": "user-plan-screen-view",
  "variants": {
    "variants": [
      {
        "id": "red",
        "params": {
          "additionalProp1": "string",
          "additionalProp2": "string",
          "additionalProp3": "string"
        },
        "weight": 20
      },
      {
        "id": "blue",
        "params": {
          "additionalProp1": "string",
          "additionalProp2": "string",
          "additionalProp3": "string"
        },
        "weight": 80
      }

    ]
  }
}'
It’s worth noting that we changed the ‘goalIds’ at the top to ‘purchase’ to measure the number of sales made from each screen color. Below that, we’ve made the ‘id’ of the experiment ‘subscription1.’
To determine the trigger event, we inserted ‘user-plan-screen-view.’ This means that when an event is triggered, the user will automatically be enrolled in the experiment.
Next, we identified the variants as ‘red’ and ‘blue’ since these are the two variables we’ll be A/B testing.
curl --location --request GET 'localhost:8080/experiment/subscription1'
Response.
{{
  "id": "subscription1",
  "variants": {
    "variants": [
      {
        "id": "red",
        "weight": 20,
        "params": {
          "additionalProp1": "string",
          "additionalProp2": "string",
          "additionalProp3": "string"
        }
      },
      {
        "id": "blue",
        "weight": 80,
        "params": {
          "additionalProp1": "string",
          "additionalProp2": "string",
          "additionalProp3": "string"
        }
      }
    ]
  },
  "triggerEventId": "user-plan-screen-view",
  "goalIds": [
    "purchase"
  ]
}
Here we’ll show you how to create a dynamic and scalable remote client configuration service (Firebase Replacement).
curl --location --request POST 'localhost:8080/config' \
--header 'Content-Type: application/json' \
--data-raw '{
  "params": {
    "additionalProp1": "red",
    "additionalProp2": "green",
    "additionalProp3": "blue"
  },
  "userId": "pixel"
}'
curl --location --request GET 'localhost:8080/config/pixel'
Response
{
  "userId": "pixel",
  "params": {
    "additionalProp1": "red",
    "additionalProp2": "green",
    "additionalProp3": "blue"
  }
}
This step involves Timeseries Event Indexing.
curl --location --request POST 'localhost:8080/events' \
--header 'Content-Type: application/json' \
--data-raw '{
  "category": "generic",
  "emitterId": "rickAstley",
  "id": "Rickrolling",
  "labels": {
    "channel": "youtube",
    "prankedBy": "steveTyler"
  },
  "retention": 900000,
  "type": "prank",
  "value": 100
}'
Here is a simple and flexible summary service that’s capable of keeping and maintaining summaries of multiple types of applications. These include: game scoreboards, product ratings, user ratings, incremental metrics and many more.
curl --location --request POST 'localhost:8080/summary' \
--header 'Content-Type: application/json' \
--data-raw '{
    "id": "abc",
    "transactionId": "3rd",
    "metrics": [
        {
            "id": "abc",
            "value": 2
        },
        {
            "id": "bcd",
            "value": 4
        },
           {
            "id": "fff",
            "value": 1
        }
    ]
}'
curl --location --request GET 'localhost:8080/summary/abc'
Response:
{
    "id": "abc",
    "metrics": [
        {
            "id": "abc",
            "value": 6,
            "count": 3,
            "transactionIds": [
                "3rd",
                "2nd",
                "1st"
            ]
        },
        {
            "id": "bcd",
            "value": 12,
            "count": 3,
            "transactionIds": [
                "3rd",
                "2nd",
                "1st"
            ]
        },
        {
            "id": "fff",
            "value": 1,
            "count": 1,
            "transactionIds": [
                "3rd"
            ]
        }
    ]
}
Flexible Property Storage
curl --location --request POST 'localhost:8080/drawer/abc' \
--header 'Content-Type: application/json' \
--data-raw '{
    "id": "abc",
    "values": {
        "google" : "123",
        "fb": "abc"
        }
}'
curl --location --request GET 'localhost:8080/drawer/abc'
Response:
{
    "id": "abc",
    "values": {
        "google": "123",
        "fb": "abc",
        "insta": "1222"
    }
}
Most of the commands used below are implemented using Lettuce Redis Command Annotation.
GRAPH.QUERY experiments :cmd
GRAPH.QUERY MATCH (u:User)-[:participants]->(:Exp {id: '$experimentId'}) RETURN COUNT(u.id)
GRAPH.QUERY MERGE (:User {id: '$emitterId' })-[:participants]->(:Exp {id: '$experimentId' }
TS.ADD :id * :value RETENTION :retention LABELS category :category type :type :labels
JSON.SET :id . :json")
JSON.GET :id .")
JSON.SET :id :path :value
JSON.GET :id :path
A/B testing has become integral to any marketer competing in today’s digital playground. But obtaining this software can be expensive, forcing many to operate with a sub-optimal website. And to compound this even further, creating your split-testing software has its own programming difficulties.
To create such an application requires a versatile and powerful database capable of transmitting data efficiently between components. Yet despite these obstacles, Redis removed all of these obstacles.
From just by using Redis on your laptop, you can A/B test any variable on your website and bridge yourself closer to your target market. If you want to discover more about how this application was made, then make sure to watch this YouTube Video.
Yet despite these demands, Redis’ advanced data processing capabilities made data transmission between components both hyper-efficient and reliable, creating a highly responsive application.
This meant no lags, no delays, and no causes of friction between the user and the application. From just by using Redis on your laptop, you can A/B test any variable on your website and bridge yourself closer to your target market.
If you want to discover more about how this application was made, then make sure to watch this YouTube Video.
If you’ve enjoyed this post then we also have many more for you to discover on the Redis Launchpad. From creating real-time vehicle tracking systems to building powerful drone systems to protect crop insurers in developing countries, Redis has been leveraged by programmers all over the world to improve everyday lives.
What can you do with Redis?


Thiago Camargo
If you enjoyed this application then make sure to visit Thiago’s GitHub page to keep up to date with all of the projects he’s been involved in.