Squad health checks are crucial for businesses to assess the team chemistry of their workforce. They pave the way for a better working environment by enabling managers to measure cohesion and learn about areas of concern from employees. But to fully reap their benefits, they need to be primed with a database that’s capable of providing instant feedback.
These apps require responses to be instantaneous, which is why this Launchpad App used Redis to create their very own squad health check application, Feature Creep. With Redis, the efficient transmission of data was seamless, creating a more interconnected system of components that allowed feedback to become immediate.
The acceleration of efficient data facilitated the development of a squad health check system that could be deployed by workforces of all sizes.
Let’s take a look at how they achieved this. We also have a wide variety of breakthrough apps in our Launchpad for you to get started, regardless of your preferred frameworks and languages.
Let’s take a deep dive into how you can build a squad health check system using Redis and sending the report to Discord. We’ll reveal how each component of Redis was deployed by going through each step in chronological order.
Now let’s have a look at the different components you’ll need, their functionality and the steps to take for its implementation:
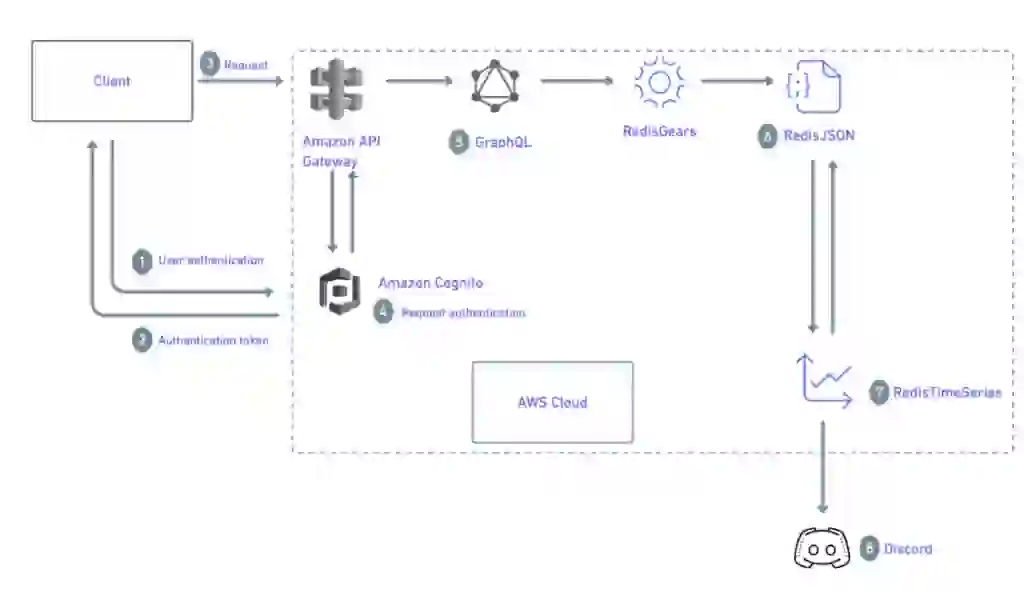
Let’s look at the overall architecture and components used for this project.
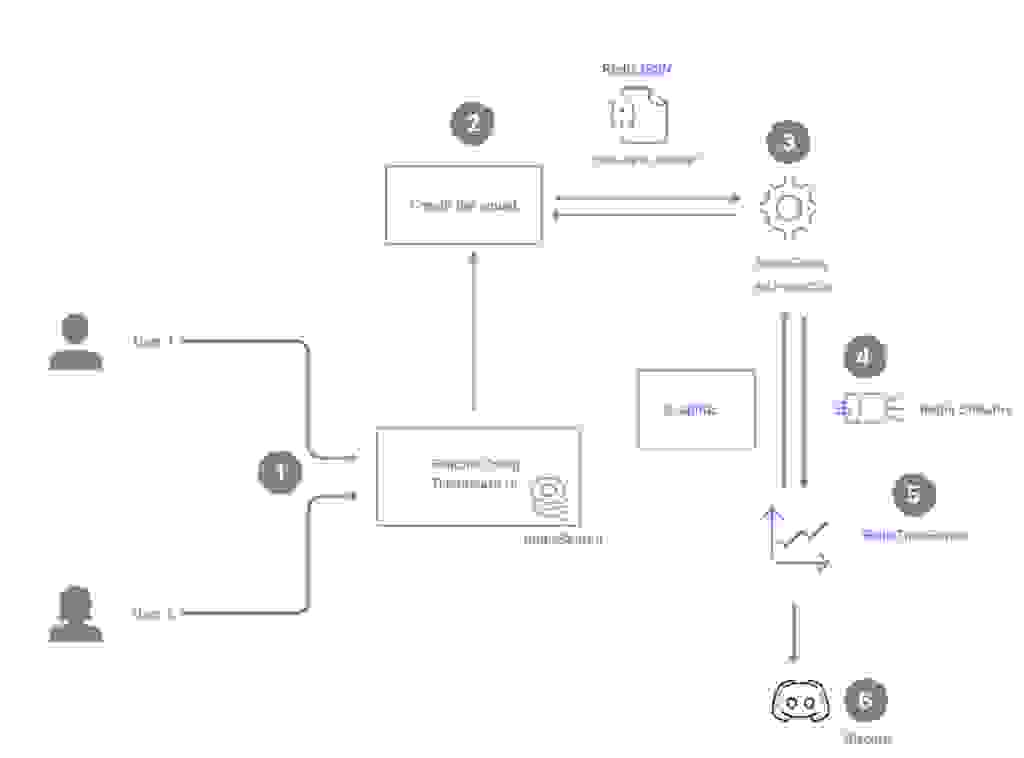
1.A user registers and logs in to access Feature Creep Dashboard UI. RedisJSON is used in the background to store session details.
2.The user then creates a ‘squad’ for their team on the dashboard. Details are stored in the form of a JSON document using RedisJSON. They can invite others to join their squad via a link that can be shared through social media or other applications e.g Microsoft Teams, Slack etc.
Once other members accept, they then have access to the dashboard. In a session, every squad member is going to get asked some questions and they can answer either positive, negative or neutral to those. Users begin with default questions, but can also add their own using RediSearch.
3. After each session, RedisGears begins the background processing of data.
4. Redis Streams is then used to handle the incoming data.
5. After background processing, a report is sent to Discord and data is saved to RedisTimeSeries.
git clone https://github.com/redis-developer/feature-creep
If you don’t require a production-grade set up, we recommend using the Docker compose installation method in development mode. This will allow you to skip deploying the AWS authentication stack. The easiest way to start up the application is to use the following Docker compose file:
In development mode, any calls to the API are automatically authenticated. This means that only 1 user can exist in the database at any time. Run the below command to boot up all of these containers:
docker-compose -f docker-compose-dev.yml up -d
Doing so will start up Redis along with a container for the server and one for the client.
For the production environment, authentication will happen through JWTs provided by AWS Cognito. If you want more details on how to set this up, visit the infra/auth folder under the project GITHUB repository.
Run the below command to bring up the server-side components:
docker-compose up -d
cd server
npm ci # Use "ci" so it respects the lockfile

# When running "npm start" you will be running in production mode
npm run build && npm start

# When running "npm run dev" you will be running in development mode
npm run dev
The ‘npm ci’ command performs a clean install of all the dependencies of your app. The ‘npm run dev’ command is used to view or run the application worked on while in development mode to see active changes.
# Make sure a redis instance is running
# Warning: the tests will write and remove data from Redis
# DO NOT run this on a production database!

cd server
npm test
Run the below commands to initiate the client-side components:
cd client
npm ci # Use "ci" so it respects the lockfile

# You might need this if you are using npm v7+
# It's a weird dependency issue
export SKIP_PREFLIGHT_CHECK=true

# Set the location of the GraphQL API (aka the server folder)
export REACT_APP_APOLLO_HTTP_URI="http://localhost:4000"
# The hostname where the app will run
export REACT_APP_HOSTNAME="http://localhost:3000"

npm start
Open up https://localhost:3000 to view the feature-creep dashboard


Typescript was used extensively. GraphQL APIs are strongly typed which enables you to take advantage of this in the frontend. These generated types are committed to the repo. Only run this if changes happened in the API.
npm run graphql:generate
Storybook helps developing components in isolation.
npm run storybook
# Visit http://localhost:6006/
Once the server is started, you can find the GraphQL playground at http://localhost:4000/. You do not need to provide any authentication when you’re in development mode.

Contains the GraphQL API, created with Apollo. When the application is running, you can visit the same URL to view the API playground.
Authentication stack
If you require a production-grade set up, then you’ll need to set up an authentication stack which is an AWS CDK deployment of a cognito user pool. An AWS CDK app is an application which is written in TypeScript, JavaScript, Python, Java, or C#. Bear in mind that each of them uses the AWS CDK to define the AWS infrastructure.
Cognito should be used because it’ll provide you with instant authentication, allowing you to move wrt creating features more efficiently. What’s more is that Cognito handles a range of tasks that include email verification, forgotten password reminders and much more.
Please note that deploying this requires a valid AWS account. Follow the below steps to configure AWS
In production mode you must first obtain a valid JWT. You can visit the Cognito login page to grab the tokens from the redirect URL. At the playground page at the bottom, you’ll see a tab “HTTP Headers.” Make sure to use the access token here, not the id token.
{
  "Authorization": "Bearer <jwt>"
}
You can find the backend code inside the folder server/src.
RedisGears contains all RedisGears functions. The file gears.ts includes a client to interact with RedisGears. It supports running functions directly and registering background functions.
The results are pushed to Redis Streams to be picked up by
Contains a very rudimentary ORM. This is where most of the business logic lives.
Contains a client and the logic for searching existing questions. When a user creates a session and adds their own question(s), they are stored and indexed by RedisSearch. Users who later want to search for questions will see these as recommendations. These can easily be added to a new session.

Contains a client and logic for your Redis TimeSeries integration. Once a session ends, background processing happens with Redis Gears. The results from that are handled by this module. It uses Redis Streams to handle the incoming data.
Inside the integration folder, you’ll find scripts that simulate how a client might use the API. There are also tests for individual files. These are next to the files they’re testing.

After creating your squad, you’ll land on the config page. At the bottom of the page, you’ll have a Discord URL input. Copy and paste your Discord URL into the box to set the new Discord token. Afterwards, you’ll then receive a test message in one of your Discord channels.
Once users have completed a session, a message will be sent to Discord. Below is an example of a report being sent to Discord.

Fast, instant and efficient, this launchpad app leveraged Redis’ ability to transmit data at great speeds to create a powerful squad health check system. Users had the freedom to customize questions which were tailored to their requirements, enabling them to devise a personalized solution.
From start to finish, the Redis components made the transmission of data smooth and efficient which generated instantaneous feedback. You can see the full app on the Launchpad along with many other exciting applications that we have.
Niek Candaele
Niek is a passionate software engineer who works at RightCrowd. To see more of his work and his activity on GitHub, you can view his profile here.