Kubernetes Secrets are often used to share secrets used by applications deployed in the Kubernetes cluster. The caveat is that Secrets are not as secure as their name may imply. Below, we highlight both the challenges posed by Kubernetes Secrets and a strategy to decouple secret management from a Kubernetes cluster.
This post, and with the help of a companion repo, describes how to create a secure deployment of Redis Enterprise on Kubernetes that leverages the power of Vault and highlights the difference between secret management and Kubernetes Secrets.
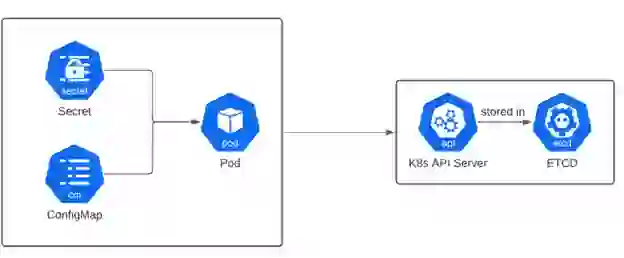
A Kubernetes Secret is used to share sensitive data such as passwords, keys, credentials, and authentication tokens. Secrets keep secret data separated from an application’s code, allowing for the management of secrets without needing code changes.
In its own documentation on Secrets, Kubernetes highlights this caution:
“Kubernetes Secrets are, by default, stored unencrypted in the API server’s underlying data store (etcd). Anyone with API access can retrieve or modify a Secret, and so can anyone with access to etcd. Additionally, anyone who is authorized to create a Pod in a namespace can use that access to read any Secret in that namespace; this includes indirect access such as the ability to create a Deployment.”
With that in mind, here are a few factors that can make secrets management a challenge:
What is a DevOps team to do? Most likely the team delegates to another service such as HashiCorp Vault.
HashiCorp Vault is a platform-agnostic, identity-based, external secrets operator. Unlike Kubernetes Secrets, Vault authorizes all access before sharing sensitive data.

A Vault secret is available from anywhere. There’s no assumption where an application has been deployed; access control is managed through Vault, where Secrets are encrypted and stored and require credentials and authorization to gain access.
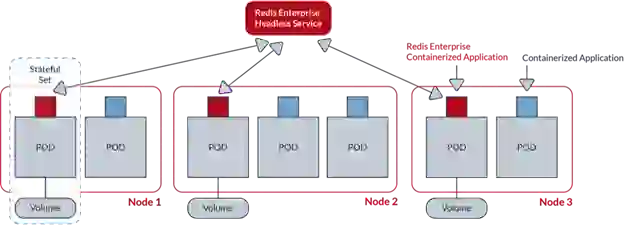
Independent of whether Redis Enterprise is installed as software, fully managed in cloud, or deployed on top of Kubernetes, users need authentication; end-to-end security is usually enabled in support of those capabilities. In the case of Kubernetes, a number of Secrets are required for both the data plane and the control plane of a Redis Enterprise cluster.
In September 2022, HashiCorp announced vault-k8s v1.0, an exciting development in the data space, as Redis Enterprise on Kubernetes now uses the Vault Sidecar Agent Injector, a Kubernetes mutating webhook controller. It also uses the resulting sidecar pattern to include a Vault Agent container, granting Redis Enterprise pods access to Vault secrets.
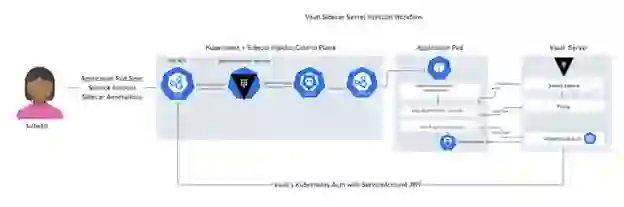
In the context of Kubernetes and Redis Enterprise, all Redis Enterprise secrets exposed by the Redis Enterprise Kubernetes Operator can be delegated to Vault through the sidecar.
Below is a walkthrough on how to create a secure deployment of Redis Enterprise on Kubernetes that uses Vault’s power. Here’s a checklist of steps necessary for a successful deployment.
The prerequisite to get started is a Kubernetes environment with enough resources for Vault and Redis Enterprise. You will want at least three nodes, each with at least six cores and 25GB of memory for Redis Enterprise. However, for sandbox purposes, you can get away with four cores and 10GB of memory.
Be sure you have enough capacity for both Redis Enterprise and Vault. The lack could potentially call for an additional node. You also need the right admin privileges from Kubernetes to install all these components.
Please note all of the following steps are completely documented in the companion repo. The first step from the repo README is to source a shell script in order to set up environment variables. Basically, when coordinating configuration across two systems, these environment variables capture the common elements. It’s important to highlight the use of separate namespaces as well as the path for storing a secret file in Vault.
…

# V_NAMESPACE is the Kubernetes namespace where the Vault service is running.

# This is referenced by the Vault config.

export V_NAMESPACE=hashicorp

…

# RE_NAMESPACE is the Kubernetes namespace where Redis is running

export RE_NAMESPACE=redis

…

# V_SECRET_PREFIX is used the Vault policy name as well as a path component for

# secrets stored in Vault. The RE_NAMESPACE is added to create a unique string

# when there are multiple RE clusters created. Each RE operator and cluster must

# be in its own namespace

export V_SECRET_PREFIX=redisenterprise-${RE_NAMESPACE}

…
Following along in the companion repo, the environment variables are substituted into templates via envsubst to avoid typing errors.
You probably already know Kubernetes is managing a set of TLS identities for itself. What’s not as clear is that the same infrastructure can be used to create a new TLS identity. Using openssl or cfssl to bootstrap the process with a private key and certificate signing request is still necessary.
To start, create two TLS identities to bootstrap the environment, one for Vault and one for the Redis Enterprise Cluster (REC). In other words, TLS is used to secure communication with the Vault, the Admission Controller API used by the REC, the data plane to the REC and, by extension, databases hosted by the REC.
In all cases, the pattern goes as so:
Create the private key
openssl genrsa -out …
Create the CSR
cat <<EOF >${TMPDIR}/csr-template.conf
[req]
req_extensions = v3_req
distinguished_name = req_distinguished_name
…
EOF
Sign the CSR with the private key
envsubst <./csr-template.conf >${TMPDIR}/csr.conf

openssl req -new -key …
Request and approve a certificate through the Kubernetes cluster
envsubst <./csr-resource.template >${TMPDIR}/csr-resource.yaml
kubectl create -f ${TMPDIR}/csr-resource.yaml
kubectl certificate approve ${V_CSR_NAME}
A complete guide to setting up Vault is outside the scope of this post. The Vault tutorials are an excellent resource to explore. For the purposes of this walkthrough, a simple instance of Vault running in the Kubernetes cluster is needed (see the first steps of the companion repo). To create the sandbox environment, setting up Vault with TLS was made possible with the help of some examples from HashiCorp.
HashiCorp was kind enough to provide a Helm chart to install the Vault in the Kubernetes cluster. For this exercise, install Vault in the same Kubernetes cluster as Redis Enterprise, though in a separate Kubernetes namespace.
Of course, Vault could be in a separate Kubernetes cluster, could be deployed on bare VMs, or could be fully managed in the cloud via HCP Vault. For this configuration:
Enable TLS and the injector.
…

global:

  tlsDisable: false

injector:

  logLevel: debug

  resources:

    requests:

      memory: 256Mi

      cpu: 250m

    limits:

      memory: 256Mi

      cpu: 250m

…
Ensure there are enough resources for Vault.
…

server:

  loglevel: debug

  resources:

    requests:

      memory: 256Mi

      cpu: 250m

    limits:

      memory: 256Mi

      cpu: 250m

…
Link the Kubernetes environment to the Vault configuration.
standalone:

    enabled: true

    config: |

      ui = true

      listener "tcp" {

        address = "[::]:8200"

        cluster_address = "[::]:8201"

        tls_cert_file = "/vault/userconfig/${V_SECRET_NAME}/${V_TLSCERT}"

        tls_key_file  = "/vault/userconfig/${V_SECRET_NAME}/${V_TLSKEY}"

        tls_client_ca_file = "/vault/userconfig/${V_SECRET_NAME}/${CA_CERT}"

      }

      storage "file" {

        path = "/vault/data"

      }

      plugin_directory = "/usr/local/libexec/vault"
Refer to the companion repo for the complete configuration file.
At this point, Vault is ready to manage Redis Enterprise secrets, and Redis Enterprise knows where it wants to manage those secrets in Vault. Redis Enterprise still needs permission to access those secrets.
Specifically, Redis Enterprise should not only have full CRUD access to secrets on the agreed-upon path, but Redis Enterprise should also be able to explore the keys:
…

path "secret/data/${V_SECRET_PREFIX}/*" {

 capabilities = ["create", "read", "update", "delete", "list"]

}

path "secret/metadata/${V_SECRET_PREFIX}/*" {

 capabilities = ["list"]

}

…
Redis Enterprise uses the service account that was issued by Kubernetes.
…

vault write auth/kubernetes/role/"redis-enterprise-operator-${RE_NAMESPACE}" \

       bound_service_account_names="redis-enterprise-operator"  \

       bound_service_account_namespaces="${RE_NAMESPACE}" \

       policies="${V_SECRET_PREFIX}" \

       ttl=24h

…
The complete documentation for the Redis Enterprise Operator includes additional details worth reviewing. The companion repo provides the remainder of the configuration needed for Redis Enterprise and depends on the assumptions made throughout this post. For now, the simplified steps are:
Install the Redis Enterprise Operator:
version=$(curl -s https://api.github.com/repos/RedisLabs/redis-enterprise- …

kubectl apply -n ${RE_NAMESPACE} -f https://raw.githubusercontent.com/RedisLabs/redis-enterprise-k8s-docs/ …
Create the Redis Enterprise Cluster:
envsubst <./rec.template >${TMPDIR}/rec.yaml

kubectl create -n ${RE_NAMESPACE} -f ${TMPDIR}/rec.yaml
Add the TLS identity for the REC to Vault:
jq --null-input --rawfile certificate ${TMPDIR}/${PROXY_TLSCERT} …

kubectl cp ${TMPDIR}/rec-identity.json vault-0:/tmp -n ${V_NAMESPACE}

kubectl exec -n ${V_NAMESPACE} -it vault-0 -- vault kv put secret …
Once the REC deployment has been completed, create your database:
kubectl create -n ${RE_NAMESPACE} -f https://raw.githubusercontent.com/andresrinivasan/redis-enterprise-k8s- …
Connect:
kubectl get redb -n ${RE_NAMESPACE} -o json | jq …

redis-cli -h localhost -p ${REDB_PORT} --tls --cacert ${TMPDIR}/${CA_CERT} …
While there are a number of moving parts to this discussion, these details would usually be hidden in the automation of a real DevOps environment. In addition, general security policies, as well as specific Kubernetes policies, typically inform different strategies for creating deployment of services for keeping sensitive information secure.