


Scaling and Turbocharging Redis in AWS
Learn more


In this blog post, you will learn how to integrate AWS Lambda and Redis Enterprise Cloud. Using a sample movie-database application, you will discover how to build and deploy two Lambda functions, one in Node.js, one in Python. These two Lambda functions are used to interact with the Redis database to insert, update, delete, and query. The application uses the RediSearch API that provides rich query and search functionalities. Serverless, using AWS Lambda, fits into the growing trend towards microservice architectures as it allows developers to reduce the scope of a business “service” into a small project that can be implemented using the programming language of their choice. To learn more, watch the video below and read on for a quick overview of AWS Lambda and a deeper dive into how to build an application using Redis Enterprise Cloud and Lambda:
If you’re not already familiar with AWS Lambda—the company’s serverless compute runtime, also known as a Function-as-a-Service (FaaS)—here are the basics you need to know. (Lambda experts can jump ahead to the next section.) AWS Lambda allows applications to run a function on demand in response to a particular event, making it a good way to build event-driven architecture (EDA) applications. AWS Lambda functions, fully managed by AWS, can be created using various programming languages. Perhaps the best part of AWS Lambda is that developers don’t usually need to fully understand the application lifecycle to use it.
AWS Lambda can be invoked using several different methods: directly from the AWS Console, using events from other AWS Services such as SNS, SQS, or Kinesis, or even from the AWS Console, CloudWatch, or S3 events. In our sample movie-database application, the Lambda functions will be invoked using an HTTP REST endpoint, this is done using the AWS API Gateway. (You can find more about AWS Lambda function invocation in the documentation.)
AWS Lambda HTTP execution process
Specifically, requests via HTTP are routed to AWS’ API Gateway management tool, which parses the body, header, and parameters, and then triggers our Lambda function with this payload:
As a developer, you simply write code to expose the REST endpoint and configure the deployment to expose it inside the AWS API Gateway. (We’ll discuss this further in the next section covering our sample movie-database application.)
State and data management in serverless applications
AWS Lambda is a stateless environment. In many applications, though, you still want to share state between services or calls, and Redis can help. For simple state management, AWS developers often use ElastiCache, but many applications require more than state management, they also need persistence, rich data, high performance, and a query model. Redis Enterprise Cloud provides a fully managed service on AWS (Google Cloud and Microsoft Azure are also supported).
Now we’re ready to look at our sample movie-database application to see the key steps to build an application using Redis Enterprise Cloud and AWS Lambda.
The application uses the dataset that has been documented in the RediSearch Getting Started tutorial, which consists of a movie catalog, made of Redis Hashes. As shown in the chart below, the frontend is built using Vue.js, which calls REST endpoints to:
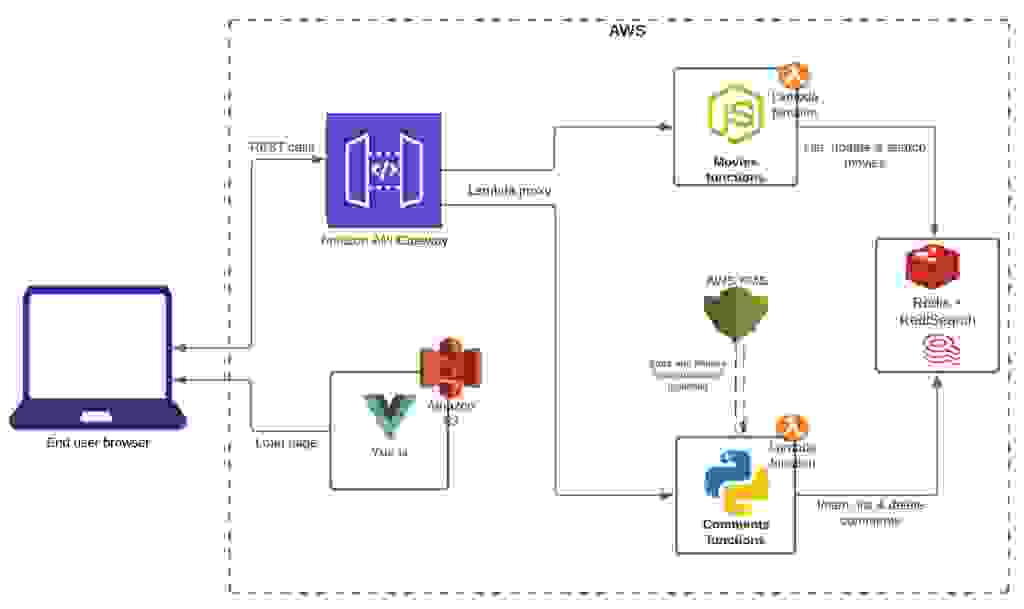
As mentioned above, the application leverages the AWS API Gateway, AWS Lambda, and Redis Enterprise Cloud for the datastore. In addition, the Python service uses AWS Key Management Service to store and encrypt the Redis database password.
To get started, you’ll need a few prerequisites:
Once you have everything assembled, let’s walk through the process of installing and running the sample application.
Step 1: Get the Redis Enterprise Cloud database information
If you have not yet created a database on Redis Enterprise Cloud, please do so using the information in our Get Started with Redis Modules guide.
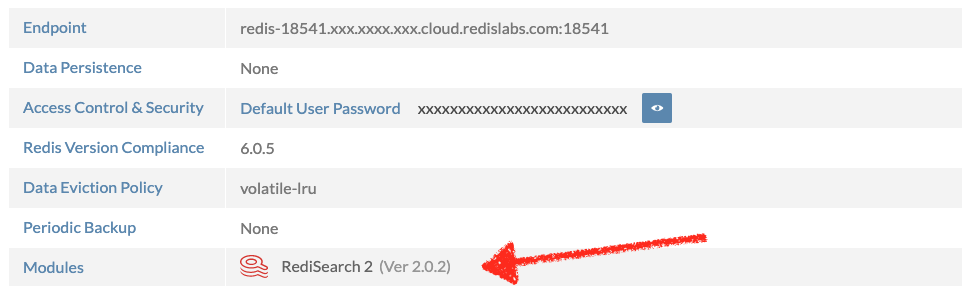
When you are connected to the Redis Enterprise Cloud, you can find the database connection information in the web console; be sure you add the module “RediSearch 2” to the database.
You will need the following properties to connect the Lambda functions to your Redis database:
Step 2: Get the project from GitHub
Clone the repository to your local environment, and move it to the project directory
> git clone https://github.com/redis-developer/aws-redis-cloud-demo.git

> cd aws-redis-cloud-demo
The project directory structure is shown here:
aws-redis-cloud-demo
├── README.md
├── front-end                   => Vue.js project
│   ├── .env.development        => to set the Lambda URLs in dev mode
│   ├── .env.production         => to set the Lambda URLs in production mode
│   ├── ...
│   └── vue.config.js
│   └── ...
├── movie-comments-microservice => The Python, comments service
│   ├── .chalice
│   │   └── config.json         => Lambda & Service configuration
│   ├── app.py
│   ├── chalicelib              => Contains application code and lib
│   │   └── ….
│   ├── readme.md
│   └── requirements.txt
└── movies-list-microservice    => The Node.js, movie service
    ├── import_movies.redis     => Dataset file
    ├── ...
    ├── serverless.yml          => Lambda & Service configuration
    ├── src
    │   └── ...
    └── ...
Step 3: Import the movie-database dataset into your application
The file aws-redis-cloud-demo/movies-list-microservice/import_movies.redis contains all the Redis commands to insert movies into the database. The commands used are:
To import the dataset, open a terminal and run the following command:
> export REDISCLI_AUTH=<YOUR_DB_PASSWORD>
> redis-cli -h redis-18541.xxx.xxxx.xxx.cloud.redis.com \
        -p 18541 < movies-list-microservice/import_movies.redis
Step 4: Configure the application to use your Redis Enterprise Cloud instance
Before testing the application, you must configure the Node.js and Python services with your Redis Enterprise Cloud database instance. Open these files:
Then set the Redis host, port, and password: (REDIS_HOST, REDIS_PORT, REDIS_PASSWORD)
Step 5: Build and run the movie microservice (Node.js)
Follow the steps listed here to build and run the project. (You can also find all the information in the project’s Readme file.)
> npm install -g serverless
2. Go to the movies-list-microservice directory
> cd movies-list-microservice
3. Install dependencies
> npm install
4. Run the Lambda function locally
> npm start
5. Test the service by opening a browser call to the REST service: http://localhost:3000/api/movies/1
6. Deploy the service to AWS, by running the following command to deploy the function to your AWS environment:
> serverless deploy
................................
Serverless: Stack update finished...
Service Information
service: movies-list-microservice
stage: api
region: us-east-1
stack: movies-list-microservice-api
resources: 33
api keys:
None
endpoints:
GET - https://<xxx>.execute-api.<reg>.amazonaws.com/api/movies/search
GET - https://<xxx>.execute-api.<reg>.amazonaws.com/api/movies/group_by/{field}
GET - https://<xxx>.execute-api.<reg>.amazonaws.com/api/movies/{id}
POST - https://<xxx>.execute-api.<reg>.amazonaws.com/api/movies/{id}
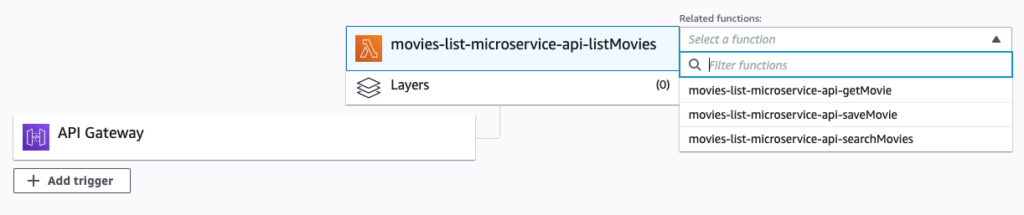
functions:
listMovies: movies-list-microservice-api-listMovies
searchMovies: movies-list-microservice-api-searchMovies
getMovie: movies-list-microservice-api-getMovie
saveMovie: movies-list-microservice-api-saveMovie
layers:
None
7. Test the API by pointing your browser to https://<xxx>.execute-api.<reg>.amazonaws.com/api/movies/1
Note: if you receive an error, check the functions log in AWS CloudWatch to see what happened.
A deeper look at the code:
Step 6: Build and run the comments microservice (Python)
Here are the steps to build and run the project. (You can also find all the information in the project’s Readme file.)
> cd movie-comments-microservice

> python3 -m venv chalice-env

> source chalice-env/bin/activate
2. Install the dependencies:
> pip install -r requirements.txt
3. Set up the AWS environment, run the following command, and configure your ID and Secret:
> aws configure

AWS Access Key ID [None]: ****************ABCD
AWS Secret Access Key [None]: ****************abCd
Default region name [None]: us-west-2
Default output format [None]:
4. Deploy the service to AWS, by running the following command to deploy the function to your AWS environment:
> chalice deploy

Reusing existing deployment package.
Updating policy for IAM role: movie-comments-microservice-dev
Creating lambda function: movie-comments-microservice-dev
Creating Rest API
Resources deployed:
  - Lambda ARN: arn:aws:lambda:us-east-1:11111111111:function:movie-comments-microservice-dev
  - Rest API URL: https://XXXXXXX.execute-api.us-east-1.amazonaws.com/api/
A deeper look at the code:
Optionally, you can store the Redis database password in AWS Key Management Service. You can find the configuration steps in the project documentation.
Step 7: Run the frontend application
> cd front-end

> npm install
2. Edit the .env.development file to set the URL of the movie and comment services:
VUE_APP_MOVIES_SERVICE=https://<xxx>.execute-api.<reg>.amazonaws.com/api
VUE_APP_COMMENTS_SERVICE=https://<xxx>..execute-api.<reg>.amazonaws.com/api
3. Run the application:
> npm run serve
4. Open your browser, and go to http://localhost:8084
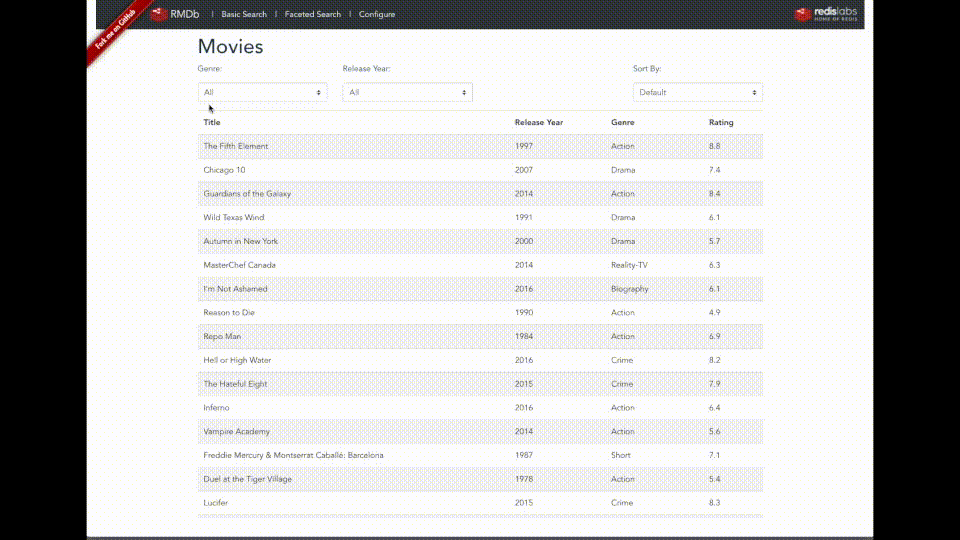
You can now navigate in the application, update and search movies, and add/delete comments.
Optionally, you can use S3 and CloudFront to deploy the Vue application in your AWS environment and serve it publicly to your users. This is explained in the project documentation.
Working with AWS Lambda and Redis Enterprise Cloud simplifies the deployment of your services. Using Redis Enterprise Cloud with RediSearch, you can easily query Redis data using values, allowing you to use Redis as the main database of your services.
Redis Enterprise Cloud is compatible with Redis, allowing you to easily migrate your existing Redis deployments, both OSS and managed services. You just need to change the connection parameters (such as database endpoints). There are multiple ways to perform a live migration, including:
In addition to RediSearch, Redis Enterprise Cloud lets you use other promising data models such as graph, JSON, time series, and Bloom filters, and offers a wide variety of other database features critical in production environments, including high availability, scalability, persistence, security, and Active-Active geo-distribution.
Want to learn more? Check out our AWS re:Invent home page and read these tutorials and blog posts: