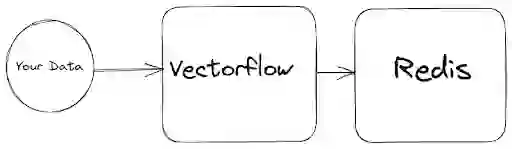
Building an application that uses vector embeddings? You’ve probably gone through several phases: obtaining your raw data, attempting to chunk it, vectorizing the raw data, and then uploading the vectors to a chosen vector database.
This procedure involves numerous steps, and that’s where a tool like VectorFlow comes in.
VectorFlow is a vector embedding pipeline that helps preprocess your data and ingest it into a vector database. It alleviates the stress and time required for manually performing data chunking and vectorization.
In this article, we will combine VectorFlow with Redis to construct a vector embedding pipeline. Redis will function as our vector database, while VectorFlow will handle the remaining tasks.
Before we delve into building our pipeline, let’s learn more about VectorFlow. VectorFlow is an open-source vector embedding pipeline, and its codebase is hosted on Github at https://github.com/dgarnitz/vectorflow. Currently, it functions with images and text of various file formats. VectorFlow is compatible with multiple embedding models, including third-party embedding models like OpenAI embeddings. It can also execute any Hugging Face Sentence Transformer model on the go without requiring any API key.
You can run VectorFlow locally or use its free cloud offering. In this article, I will be using VectorFlow locally. Let me guide you through setting it up. First, we’ll clone its repository:
git clone https://github.com/dgarnitz/vectorflow.git
After cloning the repository, the next step is to navigate to its root folder and execute the setup.sh command.
cd vectorflow
./setup.sh
With this process, you’ll have VectorFlow set up locally.
Our unstructured text data will be fed into VectorFlow. VectorFlow will segment the text data into chunks. Then, it will use a chosen vectorization model to convert these segmented parts into vector embeddings. For this demonstration, I’ll be using OpenAI’s embeddings, which typically requires API keys, but you can opt for any Hugging Face Sentence Transformer model. Once the embeddings are generated, they will be stored in the Redis vector database. For this example, we’re using Paul Graham’s article titled “What I Worked On,” but you can use any textual or image data of your preference.
You might have previously used Redis as an in-memory key-value store or even as a NoSQL database. However, what you might not have known is that Redis can also function as a vector database. The quickest way to get started with Redis is by using Redis Cloud. Create a Redis account and take advantage of its free plan. Alternatively, you can use Redis Stack to run it locally on Docker. After setting up your account, install the Redis client. You can choose any Redis client you prefer. In this article, I will focus on using the Redis Python client.
!pip install redis
We need three parameters to connect to our Redis database. These parameters are:
Here are the parameters placed into a variable:
hostname = "redis-hostname"
port = 12345
password = "****"
Let’s connect to our redis database:
r = redis.from_url(url = f'redis://{hostname}:{port}', password=password, decode_responses=True)
Now let’s test our connection.
r.ping()
This should return True if you set up everything properly.
To prepare our Redis instance for working with vector embeddings, we need to establish an index name and assign a prefix to it. The prefix is crucial as it enables us to locate it within Redis.
INDEX_NAME = "vectorflow_idx"
DOC_PREFIX = "vec:"
Next, we need to establish a schema for our index. VectorFlow enforces a standard schema, comprising the following:
This schema will be stored in Redis using the Redis hash data structure. The id will serve as the key of our hash set, while source_data and source_document will be TextField. Meanwhile, embeddings will be categorized as VectorField.
from redis.commands.search.field import VectorField, TextField

schema = (
    TextField("source_data"),
    TextField("source_document"),
    VectorField("embeddings",
        "HNSW", {
            "TYPE": "FLOAT32",
            "DIM": 1536,
            "DISTANCE_METRIC": "COSINE",
        }
    ),
 )
Given our schema definition, let’s focus on our VectorField definition. It begins by taking in the name of the field, which in this case is “embeddings”. Then, it invokes the algorithm we are using, such as HNSW (Hierarchical Navigable Small World). The third parameter represents the configuration of our embeddings. The TYPE parameter defines the data type of the vector field, and the DIM parameter determines the dimension of the embeddings field. This value is determined by the vectorization model you choose. I used 1536 because I am using OpenAI embeddings. The DISTANCE_METRIC is set to cosine. These values are all contingent on your specific configuration.
# index Definition
definition = IndexDefinition(prefix=[DOC_PREFIX],
index_type=IndexType.HASH)
Next, we create our index definition. In this definition, we specify that the index is a hash set. Additionally, we designate the index prefix we defined earlier.
# create Index
r.ft(INDEX_NAME).create_index(fields=schema,
definition=definition)
We then create our index by specifying the name, its schema, and the previously established definition. With these steps completed, our Redis database is prepared to work with VectorFlow.
Now that we have set up our Redis vector database, let’s perform data ingestion using VectorFlow, which happens through HTTP endpoints. The endpoint used for data ingestion is embed/, which is a POST endpoint.
Let’s configure our environment variables. We require three secret environment variables that should never be exposed.
The three secret environment variables are:
%env VECTORFLOW_API_KEY=your-vectorflow-api-key
%env EmbeddingAPI_Key=your-openai-key
%env VectorDB_Key=your-redis-instance-password
Then, we define our VectorFlow URL. I’m using a local version of VectorFlow, but your deployment could be located anywhere.
import os

url = "http://localhost/embed"
headers = {
    "Content-Type": "multipart/form-data",
    headers: {
        "Authorization": os.getenv('VECTORFLOW_API_KEY'),
        "X-EmbeddingAPI-Key": os.getenv('EmbeddingAPI_Key')
        "X-VectorDB-Key": os.getenv('VectorDB_Key'),
    },
}
Let’s define our metadata. Within the metadata, we specify our embeddings metadata and vector database metadata.
data = {
    'EmbeddingsMetadata':
    '{"embeddings_type": "OPEN_AI", "chunk_size": 256, "chunk_overlap": 128}',
    'VectorDBMetadata':
    '{"vector_db_type": "REDIS", "index_name": "vectorflow_idx", "environment": "redis://redis-13952.c14.us-east-1-3.ec2.cloud.redislabs.com:13952", "collection": "vect"}'
}
In the embedding metadata, I’ve specified the chunk size as 256 and an overlap of 128. Because I’m using OpenAI embeddings, I’ve specified the embedding type as “OPEN_AI”. The VectorDBMetadata encompasses all our vector database information: the vector database type, our index name, collection (our index prefix), and our Redis URL from our environment.
This setup is crucial in providing specific instructions for handling chunking and embeddings for the data ingestion process.
Next, we will download our data. Let’s write a function to perform that task.
def download_file(url, save_path):
    response = requests.get(url)
    if response.status_code == 200:
        with open(save_path, 'wb') as file:
            file.write(response.content)
        print("File downloaded successfully")
    else:
        print(f"Failed to download the file. Status code: {response.status_code}")
Then, we set the URL destination for our file.
data_url = 'https://raw.githubusercontent.com/EteimZ/LLM_Stack/main/llama_index/pg-what-i-worked-on/data/paul_graham_essay.txt'
With this process, we should have obtained our data. Next, we need to add our file to a dictionary that contains a SourceData key.
file = {"SourceData": open("paul_graham_essay.txt", "rb")}
Now that we have gathered all the necessary components, we make a POST request to the embed endpoint using the url we specified earlier. We’ll pass our headers, data, and the file in this request.
response = requests.post(url, headers=headers, data=data, files=file)
Then we examine our response text:
print(response.text)
We should expect to receive a response similar to this:
{"JobID": 1, "message": "Sucessfully added 2 batches to the queue"}
When data is uploaded to VectorFlow, it is sent to a background worker that manages all the vectorization processes.
To check the status of the task, make a GET request to the endpoint /jobs/<int:job_id>/status. The job_id represents the ID returned from the previous request.
In my case, my request will appear like this:
!curl localhost/jobs/1/status
If the request is still ongoing, you will receive a response like this:
{"JobStatus": "IN_PROGRESS"}
If the process is completed, the response will be as follows:
{"JobStatus": "COMPLETED"}
With this process, you have successfully ingested your embeddings into Redis. You can now use your embeddings for any task of your choice.
Let’s put together all the steps we have completed.
import os

url = "http://localhost/embed"

headers = {
    "Content-Type": "multipart/form-data",
    headers: {
        "Authorization": os.getenv('VECTORFLOW_API_KEY'),
        "X-EmbeddingAPI-Key": os.getenv('EmbeddingAPI_Key')
        "X-VectorDB-Key": os.getenv('VectorDB_Key'),
    },
}

data = {
    'EmbeddingsMetadata':
    '{"embeddings_type": "OPEN_AI", "chunk_size": 256, "chunk_overlap": 128}',
    'VectorDBMetadata':
    '{"vector_db_type": "REDIS", "index_name": "vectorflow_idx", "environment": "redis://redis-13952.c14.us-east-1-3.ec2.cloud.redislabs.com:13952", "collection": "vect"}'
}

file = {"SourceData": open("test_text.txt", "rb")}

response = requests.post(url, headers=headers, data=data, files=file)

print(response.text)
When undertaking any project, selecting the appropriate tools is crucial for its success. VectorFlow is a relatively new project and it’s open-source. Therefore, head over to its GitHub repository, give it a star, and review its issues. Perhaps there’s an issue you can address or contribute to.