Never before has online learning been so accessible. Whether you want to discover more about cryptocurrency, sharpen your programming skills or even just learn a new language, the digital age has gifted everyone access to a phenomenal amount of content.
However, over time e-learning has been viewed as just another digital commodity, where users expect all online content to be instantaneous. Speed remains crucial to performance, where any lags or delays in page loading time kills the user’s experience.
And so these high expectations require any competent e-learning platform to be powered by a database that’s capable of handling, processing and transmitting data with hyper-efficiency…which is exactly why this Launchpad App used Redis.
From start to finish, this application was built to connect, educate and empower learners by connecting them with the most relevant courses based on their interests.
Let’s investigate how this was achieved. But before we dive in, you may also want to check out all of the other amazing applications that we have on the Launchpad.
You’ll build a powerful e-learning platform that will connect students and teachers with one another along with a diverse library of online courses. With speed being the linchpin to performance, you’ll deploy a number of different Redis components to achieve this objective.
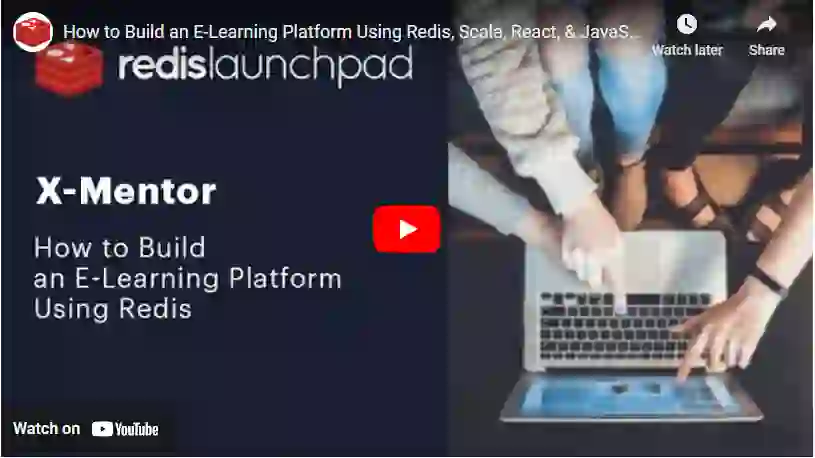
Below we’ll reveal what components are required to make this application come to fruition along with the functionality of each item.

The data model is expressed through nodes and relations using RedisGraph. The model is very simple since it involves the Student, Course and Topic entities expressing the different kinds of relations between each other.

X-Mentor follows an Event Driven Architecture approach in which the following Domain Events are considered:
https://github.com/redis-developer/x-mentor
$ docker-compose ps
Name                         Command               State            Ports
---------------------------------------------------------------------
x-mentor_x-gears_1           python3 init.py --url redi ...   Up
x-mentor_x-keycloak_1        /opt/jboss/tools/docker-en ...   Up       0.0.0.0:8880->8080/tcp, 8443/tcp
x-mentor_x-mentor-client_1   /docker-entrypoint.sh ngin ...   Up       0.0.0.0:3000->80/tcp
x-mentor_x-mentor-core_1     /opt/docker/conf/wait-for- ...   Up       0.0.0.0:9000->9000/tcp
x-mentor_x-redis_1           redis-server --loadmodule  ...   Up       0.0.0.0:6379->6379/tcp
[node1] (local) root@192.168.0.8 ~/x-mentor
$
Wait until Keycloak and x-mentor-core are ready, then go to http://localhost:3000.
You can access Keycloak via 8880 port as shown below:

Use admin/admin to login into keycloak.

This step starts the authentication process against Keycloak by:
Use the following code to check and see whether the username already exists in users bloom filter:
BF.EXISTS users '${student.username}'

Signing up involves 4 steps:

BF.ADD users '${student.username}'
GRAPH.QUERY xmentor "CREATE (:Student {username: '${student.username}', email: '${student.email}'})"
TS.CREATE studentprogress:${username} RETENTION 0 LABELS student ${username}
In this step we’re going to show you how to create courses to go on the e-learning platform. Each course is going to be stored as a JSON in RedisJSON.
:
Follow the commands below:
GET course-last-index
INCR course-last-index
JSON.SET course:${course.id} . '${course.asJson}'
BF.ADD courses '${course.id}'
GRAPH.QUERY xmentor "CREATE (:Course {name: '${course.title}', id: '${course.id.get}', preview: '${course.preview}'})"
XADD course-created $timestamp title ${course.title} topic ${course.topic}
Here we’ll uncover how you can enroll a student in a specific course.

Below are the steps for you to follow:
BF.EXISTS users ${student.username}
JSON.GET course:${course.id}
GRAPH.QUERY xmentor "MATCH (s:Student), (c:Course) WHERE s.username = '${studying.student}' AND c.name = '${studying.course}' CREATE (s)-[:studying]->(c)"
As part of any online resource, users generally are able to provide a review. To make this functionality happen, you need to carry out the following steps:
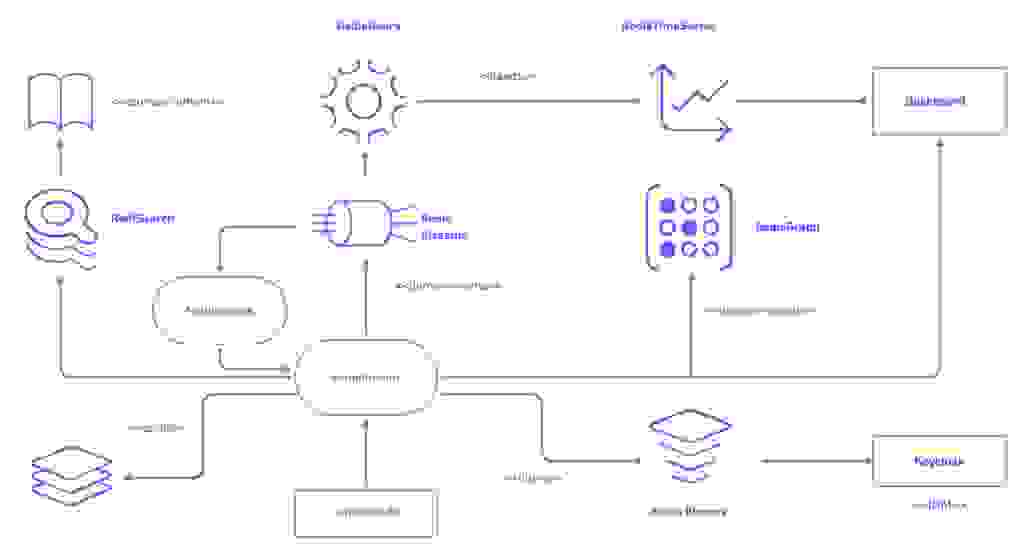
The following diagram illustrates the interaction between Redis Graph and Redis Streams.

To bring make this functionality happen, follow the below commands:
GRAPH.QUERY xmentor "MATCH (student)-[:studying]->(course) where student.username = '$student' RETURN course"
GRAPH.QUERY xmentor "MATCH (student)-[:rates]->(course) where student.username ='$student' RETURN course"
GRAPH.QUERY xmentor "MATCH (s:Student), (c:Course) WHERE s.username = '${rating.student}' AND c.name = '${rating.course}' CREATE (s)-[:rates {rating:${rating.stars}}]->(c)"
XADD course-rated $timestamp student $student_username course $course
	starts $stars
All
The following commands retrieves courses by query from redisJSON with rediSearch
FT.SEARCH courses-idx ${query}*
By ID
BF.EXISTS courses ${course.id}
JSON.GET course:${course.id}
GRAPH.QUERY xmentor “MATCH (student)-[:studying]->(course) where student.username = ‘$student’ RETURN course”
FT.SEARCH courses-idx ${course.title}
Now we’ll show you how to allow students to filter preferred courses based on their interests. Here’s how to do it:
The following diagram shows the interaction between RedisGraph and Redis Streams.

Below are the commands for you to follow:
GRAPH.QUERY xmentor "MATCH (student)-[:interested]->(topic) WHERE
student.username ='$student' RETURN topic"
GRAPH.QUERY xmentor "MATCH (s:Student), (t:Topic) WHERE s.username =
	'${interest.student}' AND t.name = '${interest.topic}' CREATE
(s)-[:interested]->(t)"
GRAPH.QUERY xmentor "MATCH (student)-[interest:interested]->(topic) WHERE student.username='${interest.student}' and topic.name='${interest.topic}' DELETE interest"
XADD student-interest-lost $timestamp student ${student.username} topic $topic
XADD student-interest-lost $timestamp student ${student.username} topic $topic
Here we’re going to show you how to create a course recommendation system that connects users with courses that are most relevant to their interests. A lot of this comes down to the advanced capabilities of RedisGraph.
Searching for relations between nodes in the graph database is the easiest way to implement the most effective recommendation strategies. Let’s have a look at how to do this.
In order for you to create a special recommendation system that matches users’ personal interests with the most relevant courses
GRAPH.QUERY xmentor "MATCH (student)-[:studying]->(course) where student.username = '$student' RETURN course"
GRAPH.QUERY xmentor "MATCH (topic:Topic) RETURN topic"
GRAPH.QUERY xmentor "MATCH (topic:Topic)-[:has]->(course:Course)
GRAPH.QUERY xmentor "MATCH (student)-[:studying]->(course) WHERE course.name = '$course' RETURN student"
GRAPH.QUERY xmentor "MATCH (topic)-[:has]->(course) WHERE
	topic.name = '${topic.name}' RETURN course"
GRAPH.QUERY xmentor "MATCH (student)-[:interested]->(topic) WHERE student.username ='$student' RETURN topic"
GRAPH.QUERY xmentor "MATCH (student)-[:studying]->(course),
	(topic)-[:has]->(course) where student.username = '${student.username}'
	and topic.name = '${topic.name}' RETURN course"
GRAPH.QUERY xmentor "MATCH (student)-[:studying]->(course), (topic)-[:has]->(course) WHERE student.username = '${student.username}' RETURN topic"
This functionality will allow you to track the amount of time users spend watching courses on the platform. That information will then be used to implement the Leaderboard.

Once x-mentor-core receives the request, it will then publish the Student Progress Registration Domain Event. This will end up as an element inside student-progress-registered stream (which is a Redis Stream) via the following command:
XADD student-progress-registered $timestamp student $student_username duration $duration
All of the data sent to RedisGears will be pushed to the stream and will then sink this data into Redis TimeSeries using the following command:
TS.ADD studentprogress:$student_username $timestamp $duration RETENTION 0 LABELS student $student_username
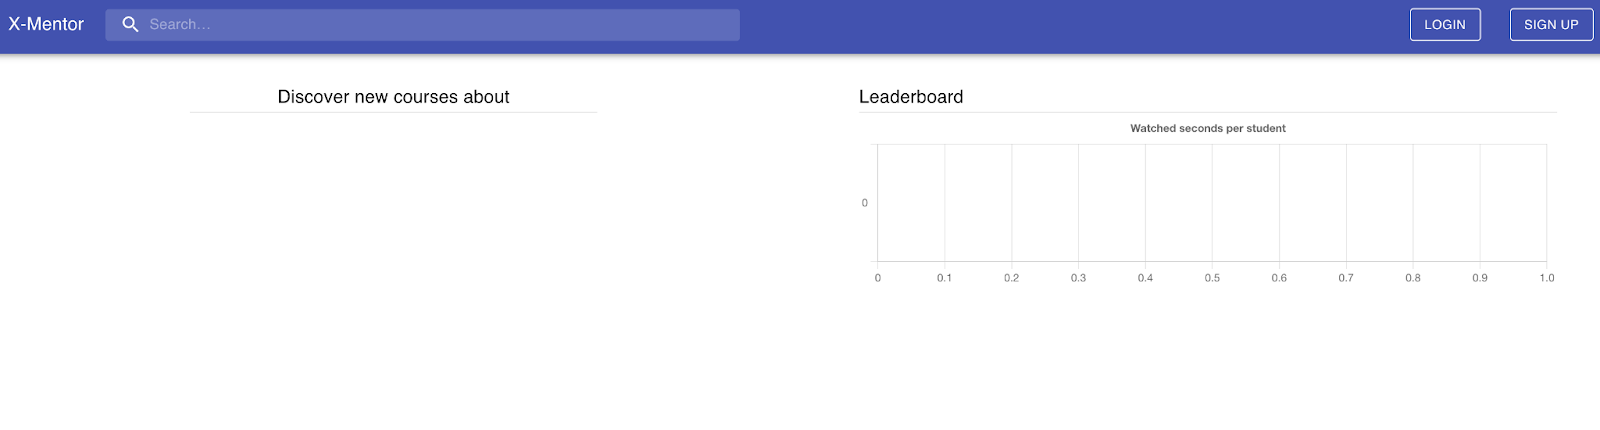
The Leaderboard functionality enables you to have a board that displays the rankings of the top students that use X-Mentor. Students are ranked based on the amount of time they spend watching content on the platform – the more you watch, the higher you rank.
To accomplish this, you need to separate two functionalities:

When the user request for the leaderboard data, first look at Redis for the time series keys
LRANGE student-progress-list 0 -1 // to retrieve all the list elements
For each key, you need to use Redis TimeSeries to get the range of samples in a time window of three months performing sum aggregation. You can use the code below to make this happen:
TS.RANGE $student_key $thee_months_back_timestamp $timestamp AGGREGATION sum 1000
Below are additional requisites that need to be implemented for this to happen.
Carrying out these commands will provide you with the accumulated screen time of each student. Once you receive these rankings, you can create a ranking system based on those who have the most screen time.
Being this far into the digital age, a simple prerequisite of any application is for it to operate at maximum speed. This is especially true for e-learning platforms where users are meant to be engaged with its course content for long periods of time.
A mere lag will create friction between users and the application, inhibiting its ability to connect teachers with students as well as providing value through its courses. Having Redis as the application’s main database removed this threat and helped to create a fully optimal application that catered to the user’s demands with ease.
To get a more visual insight into how this application was created, then you can watch this YouTube video here. We also have a diverse range of applications for you to check out on the Redis Launchpad that are having an impact on everyday life around the world.
So make sure to check them out!


Sergio Cano
Sergio is a full-stack engineer and in his own words ‘loves solving problems and learning new stuff.’
Being an enthusiastic learner, it’s not difficult to see where he got the inspiration to build this application.
Make sure to check out his profile here and see what other projects he’s been involved in.